

The popularity of switching play as a tactical concept has long been a dominating strategy in the world of football. Its popularity is exemplified by the many different forms and names it has taken on over the years such as shifting the ball from side to side or playing across the direct game channels. Even at the younger ages, switching play can be an essential tactic to deploy with any team. Concepts like maintaining width, not forcing the ball forward, crossing, and shifting the ball from left to right are universal to the sport, regardless of age. This is The Mastermind‘s Guide to Switching Play for a 9v9 team.
KEY FACTOR: USE OF THE CENTRAL MIDFIELDER
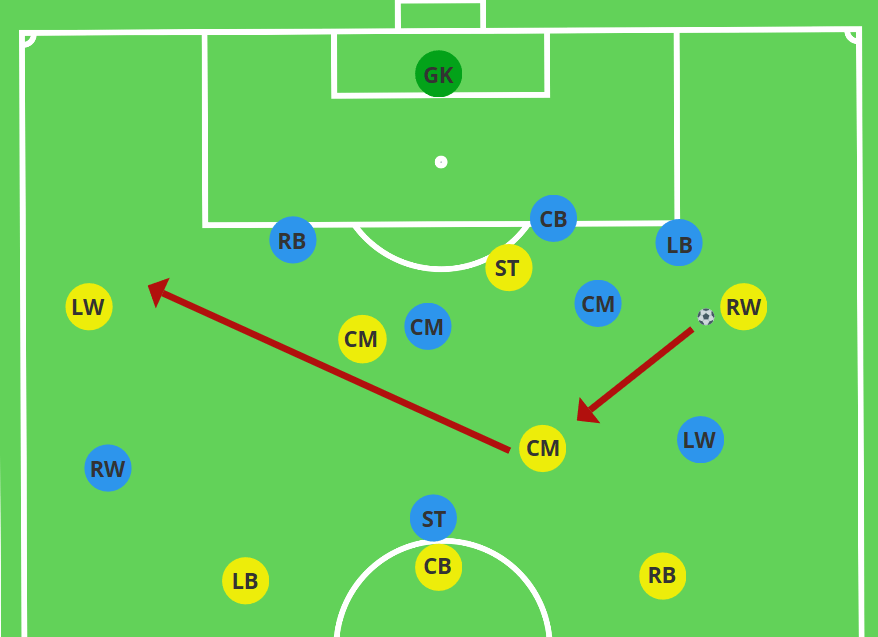
In order to switch play from one side to the other, it may be most advantageous to first link up with a player in a central area. This can be a goalkeeper or a central defender when the ball is in our half, or a central midfielder when we have possession in our opposition’s half. In this example above, the blue team has shifted to the right to stop us from playing down the line. We can no longer advance forward, so we are going to slow down the tempo of the game and look to play backwards to our central midfielder (notice one higher, one lower in attack). Our central midfielder will then look to switch play to our open left winger, exploiting the weak side of the opposition. It is important that our left winger (and left defender) maintain width on the far side in order for switching play to be possible.
KEY FACTOR: USE OF FULLBACK TO CREATE AN OVERLOAD
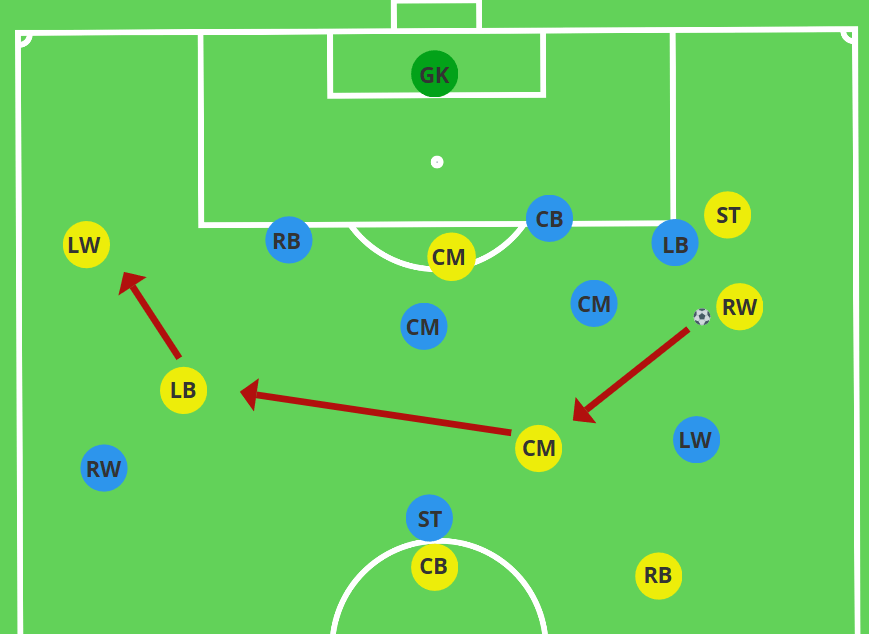
In order to switch play from one side to the other, we need to maintain width not only with our far-sided winger, but also with our far-sided defender. In this example, the blue team has again cut off our ability to play forward on the right side. Our striker has tried to create space on the right, thus drawing the defenders over with them. Through this action, we should now have even more space on the opposite side to exploit.
In order to create an overload (we have more attackers than they have defenders) the left-back in this example can gamble a bit and go forward, creating another outlet in attack. Now we can switch to our left fullback and create even more chaos for the opposition with a 2v1 situation in a dangerous area of the field. If the blue right winger realizes what is going on and tries to cut off the pass we can look to switch directly to our winger instead, with the fullback creating space for a second passing option, even if it’s just a backwards movement back into position. For more advanced teams, the fullback can also create an option for an underlap or an overlap.
KEY FACTOR: AVOID HAVING TWO PLAYERS IN THE SAME PASSING LANE

Switching play is an action that needs to be done quickly in order to truly be able to exploit the weak side of the opposition. So if two players get into the same passing lane this will only slow us down by requiring us to make an extra pass. In this example the right winger has decided to play backwards to the right defender instead, who has created space ahead of their opposing winger. The right defender has looked to play directly into their opposite fullback, but the central midfielder has gotten in the way, thus slowing down our ability for a quick switch of play. Instead the central midfielder should look to create space in either a more advanced, or deeper position.
Now that the central midfielder has created space higher up the field, a more direct switch of play is possible. If at the 9v9 level you do not have players capable of hitting cross-field balls, then using the central midfielder is still an excellent option. But perhaps it should then be the first pass, rather than the second.
KEY FACTOR: ACTIVATE SPEED

Switching play is often something that starts off with a slowing down of the game. We cannot go forwards, so we slow the tempo and go backwards. But after this initial backwards play and a quick cross-field pass, we need to accelerate the speed of the game back into full flow. As soon as the ball goes out to the far side, the players on the ball need to kick it into high gear in trying to exploit the weak side of the opposition. If we are too slow, the other team will be able to shift over in time and be able to cut off our ability to attack down the weak side.
CONCLUSION
So there it is! Tips and tricks to Switching Play from one side of the field to the other. At any age, switching play and maintaing width can be key methods for unlocking the opposition. Thanks for reading and be sure to check out more from this series below…
-> Pressing From The Front (9v9)
-> Playing out from the Back (9v9)
Discover more from TheMastermindSite
Subscribe to get the latest posts sent to your email.

9 thoughts on “Switching Play (9v9)”