
Although youth players generally don’t have the capability to switch play all the way from one end of the field to the other, changing the point of the attack is a crucial element to any format of the game and essential for coaches to teach to their players. It doesn’t matter how old they are, players will always try to go into pressure when they can simply change direction and try to switch play to the other side. Here are the basics of Switching Play, in the quest to help coaches translate the necessary elements of the tactic to their players.
PRESSURE IN FRONT OF YOU? SWITCH PLAY.
Often times players will run into traffic, but keep going right into the traffic and crash. Players need to constantly scan the field to see where the pressure is and attempt to avoid it. Changes of direction will be helpful, but players should also recognize where the defenders are positioned for the opposition. If two defenders are on the same side and only one is on the other, it might be best to switch play to the other side. Players need to be scanning at all times to try and take advantage of where they can outnumber the opposition defenders. A 2V2 situation on one side might be okay, but if the players can switch play to the other side and create a 2V1, that’s even better.
USE OF CENTRAL PLAYERS TO SWITCH PLAY

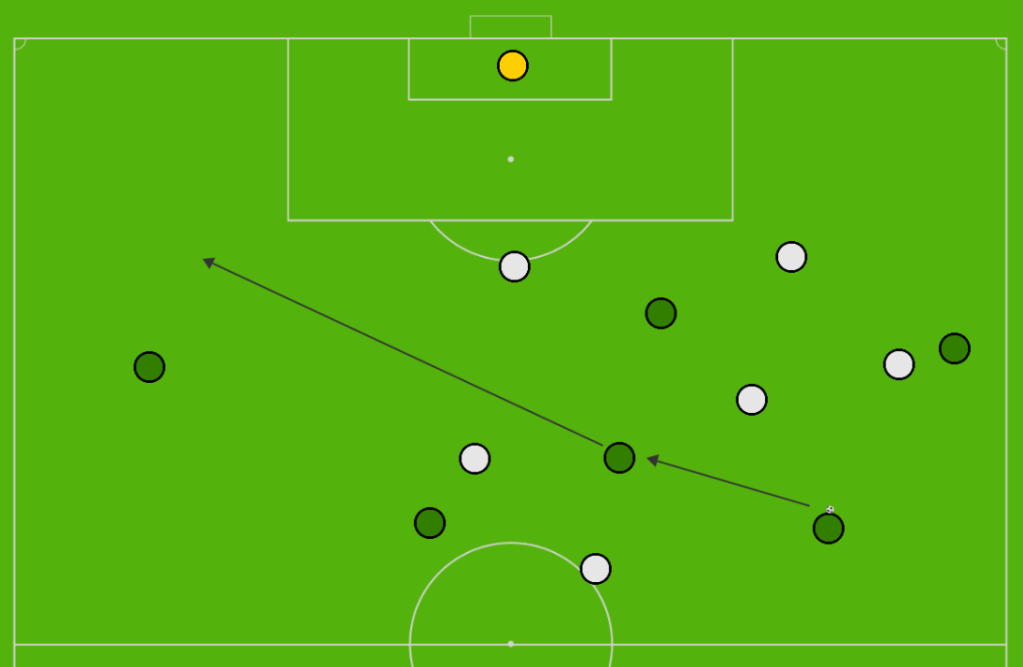
As you can see in the diagram above, the right defender has passed to the central midfielder before the switch of play. But it doesn’t have to come from central midfielder(s), it can come from defenders, strikers, the goalkeeper, or whomever might have adopted a central position in the moment. Using central players when changing the point of the attack is extremely valuable as they can be the best link to get the ball from one side to the other. Many youth players will not be able to switch the ball from one end to the other. If the right defender in the example diagram could play long from one end to the other, it’d be a great pass. But there are two problems with that. One – longer passes are always riskier and less likely to come off. Two – the team’s own player is in the way, as is one of the defenders. In a long ball attempt, the ball could easily be intercepted accidentally by the teammate or the defender. So using the central midfielder will mitigate that concern before switching play. For only a few seconds longer, the attempt to switch play now becomes more likely to come off.
maintain width
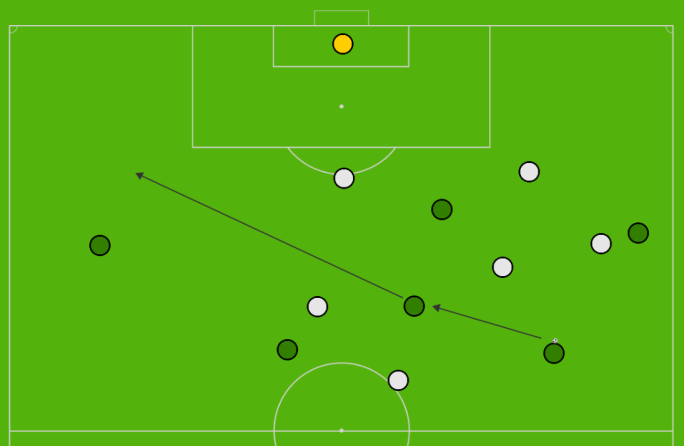
In order to switch play, wide players on the field need to maintain their width. If there is no one in the wide area on the example above, the right defender might be forced into making a dangerous pass. Even if the ball finds its way to the central midfielder as shown, with no one to switch the ball to, there’s no solid avenues to advance into for the player. Imagine for example if the situation looked like this instead….

With no width, there’s less potential to switch play. The central midfielder could still play wide, but the receiver will now be closer to the opposition defender than they were before. Further, the central midfielder might be able to make a great pass to their striker, but both the out of place defender and midfielder from the opposition will probably be able to cut that off in time. The best decision here would be to switch play, if only there was someone available in the wide area.
ACTIVATE SPEED

The final (basic) consideration for switching play is to activate speed after the switch. If the player fails to do so, the other team may be able to recover in time. This would mean they wouldn’t be able to take full advantage of the switch and could lose the great opportunity they created. Some coaches call this “losing the time edge.” After switching play, this is the perfect moment to catch the opposition off guard and outnumbered. The players on that side need to head straight toward goal as a result and take advantage of the switch.
In order to switch the play from one side to the other as quick as possible, players also need to ensure they are not in the same passing lane as anyone else on their team. Ideally, the switch will be accomplished in one-two passes. If for example the left defender on the image above ran into the path of the central midfielder’s pass, the team would lose time by needing to now make another pass to the left winger. For older teams this could even extend to the central midfielder in the image, as the right defender may have been able to switch play from one side to the other without needing the midfielder, if only the space had been vacated.
So there it is! The basics of Switching Play for young players, with diagrams and examples for a team’s first introduction to the concept at the 7v7 stage. It doesn’t matter how old the players are, every coach should be looking to teach their players how to change the point of the attack and avoid running straight into traffic. Be sure to share your thoughts in the comments below or on Twitter @mastermindsite. Thanks for reading and see you soon!
You might also enjoy….
-> Switching Play (9v9)
-> Switching Play Session Plan & Key Coaching Points
Be sure to check out more in this series….
-> Playing Out From The Back – The Basics
-> Pressing From The Front – The Basics
-> Attacking Transitions – The Basics
-> Defensive Transitions – The Basics
Discover more from TheMastermindSite
Subscribe to get the latest posts sent to your email.

7 thoughts on “Switching Play – The Basics”