

Pressing from the front is one of the most important elements of the modern game. As opposed to a low-block and allowing the opposition time and space to play out from the back, almost every professional team in existence presses high up the pitch, vigorously and rigorously in an attempt to win the ball back and go on the attack right away, closer to the opposition’s goal. As a result, coaches of any age group should be looking to teach players young and old the necessary steps of pressing from the front. In order to help guide these coaches, we examine some of the most basic elements of pressing from the front, with example diagrams for a 7v7 team playing 2-3-1.
SET-UP
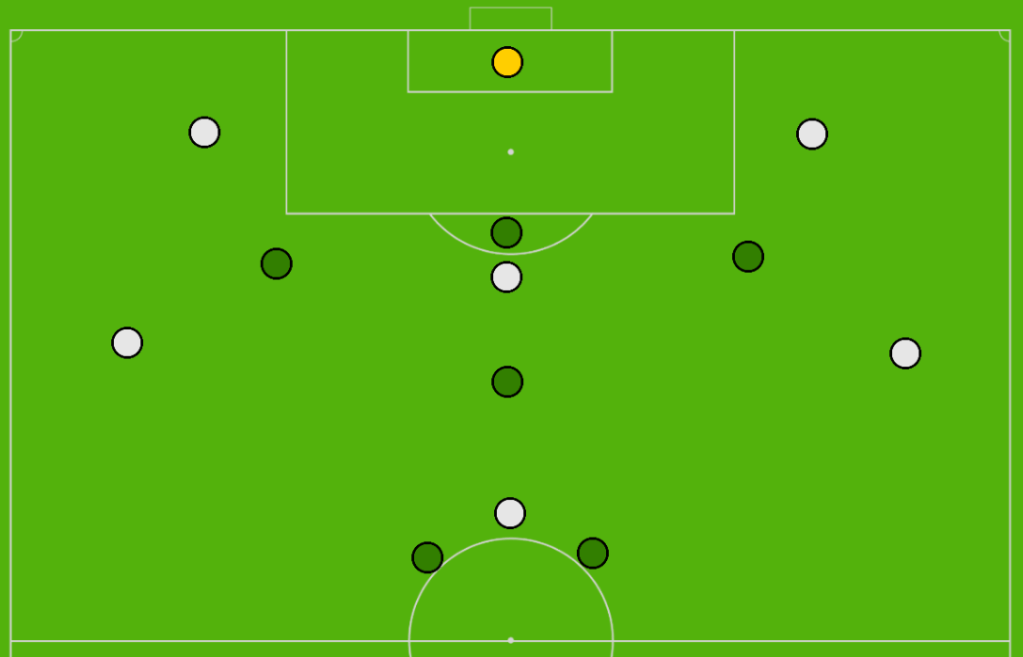
1. DIAMOND SHAPE: Regardless of the game format or number of players on the pitch, a diamond shape is highly effective in winning the ball back when pressing from the front. The green striker remains the highest, although cannot go any higher as they are not allowed in the opposition’s box on goal kicks. The two wingers remain high and wide, ready to cover the opposition wingers, while the central midfielder remains goal-side on the opposition midfielder.
2. DEFENDERS COMPACT: In smaller game formats, defenders might not be able to form their own diamond. But they should remain compact and high up the pitch, even if the opposition striker is attempting to stretch them back into their own half. Once the ball is played, the defenders shift with the play.
shifting & sliding with the play
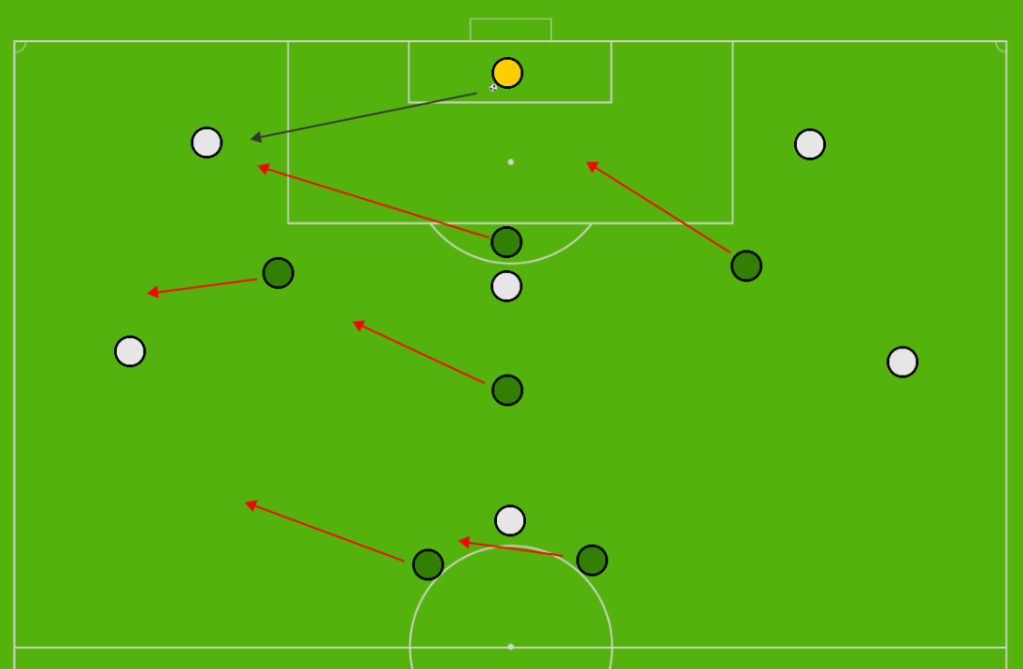
As the ball goes across from one of the goalkeepers to a defender, everyone shifts and slides with the play. Each player in the press has a distinct role, but the diamond shape should remain throughout.
Striker: The moment the ball is played, the striker is the first to pressure the player about to receive. They need to press with speed and intensity, and angle their body to force the player back toward their own goal.
Near-Sided Winger: Even though the winger will instinctually want to pressure the ball, they must cover instead, as the striker pressures. If the winger pressures and gets beat, there will be a wide open player for the opposition. As a result, the winger should cover the wide player. They can be either goal-side or in front of the player, forcing the opposition defender no choice but to make a risky pass.
Central Midfielder: The central midfielder’s role is simply to shift with the play, while remaining ball-side and goal-side on the opposition’s central midfielder. Their first role is to cover the space and cover the player. In 11v11 game formats, this may be an attacking midfielder or a second striker instead.
Far-Sided Winger: The far-sided winger shifts to the middle to provide balance and cut off the option for a backwards or sideways pass across the middle. The striker is already going to angle their body to force the opposition back toward their own goal, so by the winger coming inside and attempting to cut that off, they are in a great position to steal the ball and score a goal.
Defenders: The defenders do not need to be engaged in the initial stages of pressing from the front. In the 11v11 game, this may even extend to defensive and/or central midfielders. However, the defenders should shift with the play toward the side of the ball and provide balance in case the opposition winger suddenly gets the ball or the opposition breaks the press altogether. The other defender shifts across to remain ball-side and goal-side on the opposition’s striker.
FINAL SHAPE
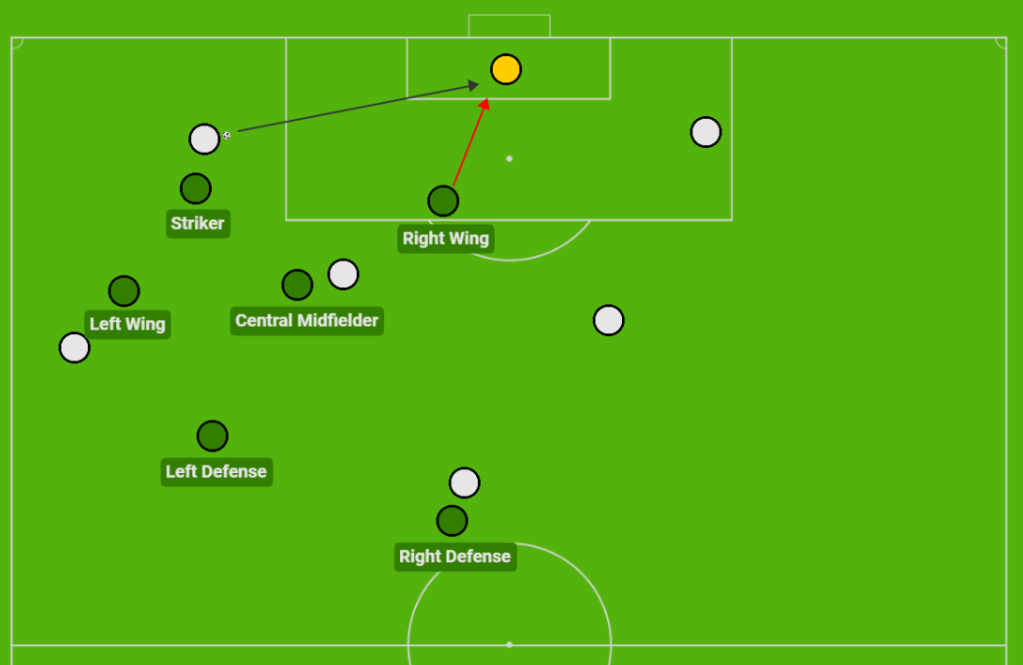
As you can see, every player has shifted across with the play and the diamond shape is maintained in two different ways. The left defender has jumped higher in case the opposition break the press, but has remained not too far away from the right defender. The striker, combined with the positional cover of the left wing and central midfielder has forced the opposition to make a backwards pass toward their goalkeeper. The right winger is positioned to pounce on that back-pass and stop a switch of play from occurring. But the right winger is also positioned centrally enough that they can stop a pass to the opposition’s left winger if the defender were to attempt that pass instead. If the right winger can put the goalkeeper under enough pressure, they can fluster them and potentially score a goal. If not, the other team will have a great chance at switching play to the other side and breaking the press.
If the opposition does in fact break the press with a switch of play, it is important that the team re-engages their press, albeit with some slight changes of roles. In 9v9 this becomes easier to accomplish, but in 7v7 the right winger will need to make a decision as to whether to pressure the ball or cover. If they cover, the defenders will have more time on the ball, but the striker can press instead. If they pressure, they might win the ball back, but they might leave the team exposed with the striker unable to cover in time.
So there it is! The basics of Pressing From The Front for any team, with diagrams and examples for a team’s first introduction to the concept at the 7v7 stage. It doesn’t matter how old the players are, every coach should be looking to teach their players how to effectively press from the front, furthering their development in the process. Be sure to share your thoughts in the comments below or on Twitter @mastermindsite. Thanks for reading and see you soon.
You might also enjoy…
> How To Coach Pressing
-> Playing Out From The Back – The Basics
-> Pressing From The Front (9v9)
-> Pressing in the 2-4-2 Formation (9v9)
Discover more from TheMastermindSite
Subscribe to get the latest posts sent to your email.

5 thoughts on “Pressing From The Front – The Basics”